Last updated: August 20, 2026
Organizing camp gear is not really a storage problem, it is a memory problem. You do not forget the tent, you forget the mallet, the spare guyline and the second lantern battery, because those live in whatever bag had room the last time you packed. Every trip then starts with the same twenty minute inventory hunt in the garage.
The fix is a system rather than a product: a small number of containers that each own a category, labels that survive rain, and a packing order that matches the order you unload. Crates, duffels, hanging organizers and pouches all have a place in that system, and knowing which job each one does is what stops you from buying four of the wrong thing.
This article contains affiliate links. If you buy through them, we may earn a commission at no extra cost to you. Learn more.
Quick Answer
How do you organize camping gear so nothing goes missing?
- Give every category its own container and never let categories mix, so a missing item is obvious before you leave the driveway.
- Use hard bins for anything with edges or fuel, soft duffels for bedding and clothing, and small pouches inside both for the parts that hide.
- Label the outside of every container with waterproof labels, not memory, and keep the list taped inside the lid.
- Hang the small daily items at the site so they never end up on the ground or in a chair.
Bottom line: organize by category and label it, then buy containers to fit the categories rather than the other way around.
Start With Categories, Not Containers
The most useful move costs nothing. Write down the categories you actually camp with, usually shelter, sleep, kitchen, light and power, hygiene, and a small repair kit, then decide which container each one gets. Buying bins first almost always produces a set of half full boxes with random overflow, which is the state you were trying to escape.
Categories also make the packing check fast. If the kitchen crate is in the car and the sleep duffel is in the car, you are not thinking about forty individual items, you are thinking about six containers. That is the whole point of the exercise.
The Repair Kit Deserves Its Own Pouch
Tent pole splint, spare guylines, a few stakes, duct tape wrapped around a pencil, zip ties, a multi tool and seam tape all belong together in one small pouch that lives in the shelter container. Scattered across three bags, none of it is findable in the dark and in the wind, which is exactly when you need it.
Camp Gear Organizers by Situation
Organizers fall into four working shapes, and most camp setups end up using all four. Hard crates carry structure, soft duffels carry volume, hanging organizers keep the daily items off the ground, and pouches keep small parts from disappearing into corners. Choose per category, not per shelf.
The Sturdy Crate That Carries the Heavy Category
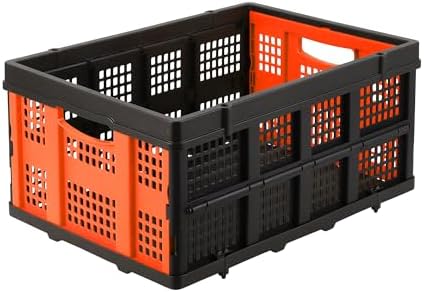
Stove, cookware, cast iron, tools and anything with a sharp edge want a rigid crate with real walls. A crate with an open top loads faster than a latching bin and lets you see what is inside, which suits a category you open several times a day. Look for reinforced corners and handles that are molded into the body rather than glued on.
The Soft Duffel for Bedding and Clothing
Sleeping bags, pillows and spare layers compress, so a large duffel uses the awkward gaps in a loaded car far better than a rigid box. A wide mouth opening matters more than fancy compartments, because you are packing bulky, soft items in a hurry. Water resistant fabric earns its place here if your gear ever rides in an open bed.

The Hanging Organizer for Daily Items at the Site
Headlamps, sunscreen, bug spray, keys, wipes and phone cables end up on the ground or lost in a camp chair unless they have a hook. A fabric organizer that hangs from a canopy leg or a tree strap keeps that layer visible and dry, and it is the single change that most reduces small item losses on a weekend.

The Pouch Set That Stops Small Parts Disappearing
Inside every crate and duffel, small zipped pouches do the real work. First aid in one, batteries and charging cables in another, repair kit in a third, spices in a fourth. Different colors beat labels here, because you learn the colors faster than you read in the dark.

Which Organizer for Which Category
Matching container to category takes about five minutes and saves that much time on every trip afterward. The rule of thumb is simple: rigid for anything with edges or weight, soft for anything bulky and light, hanging for anything you touch daily, and pouches for anything smaller than your hand.
| Category | Container type | Why it works | Watch out for |
|---|---|---|---|
| Kitchen and cookware | Rigid crate or chuck box | Handles weight and sharp edges | Gets heavy fast, keep it liftable |
| Bedding and clothing | Large soft duffel | Fills gaps in a packed car | Needs a dry spot in an open bed |
| Shelter hardware | Latching bin plus stake bag | Keeps mud and stakes contained | Wet fly should not go back inside |
| Light and power | Hanging organizer plus pouch | Visible and off the ground | Cables tangle without a pouch |
| Hygiene and first aid | Zipped pouch or tote bag | Grab and carry to a bathhouse | Keep first aid separate and obvious |
Labels That Survive Rain and Reality
A label only helps if it is still readable after a wet weekend and still true after you reorganize. Printed labels covered with clear packing tape survive better than a marker on the plastic, which fades in sun, and far better than nothing, which is what most garages run on. Put the label on the end that faces out when stacked.
Inside the lid, tape a printed contents list for that container. It doubles as a packing checklist and as the place you write down what ran out, so the note travels with the box instead of living on a phone you forget to open. When something moves between containers, update both lists on the spot.
Color Coding Beats Reading in the Dark
Assign a color per category and stick to it: one color for kitchen, one for sleep, one for shelter. Colored tape on handles, colored pouches inside, colored lids if you can buy them. At dusk, with a headlamp on red, color is readable when text is not.
Packing Order and the Site Layout
Organization only pays off if the load order matches the unload order. Shelter comes out first, so it goes in last and sits near the tailgate. Bedding goes in deepest, because it is not needed until the tent is up. The kitchen sits somewhere in the middle, reachable without unloading the whole car for a mid drive snack.
At the site, the same logic applies horizontally. Keep the kitchen container next to the table, hang the daily organizer on the canopy leg, and put shelter hardware in one spot so the mallet does not migrate. Our car camping setup guide covers the vehicle side of this, and a camp table with storage removes one container entirely by building the prep surface and the shelf into a single piece.
Mistakes That Undo a Good System
Three habits break organization faster than anything else: dumping the last odds and ends into whichever container has space, putting wet gear back into a sealed bin, and letting consumables run out without noting it. Each one is small in the moment and each one guarantees a bad first hour on the next trip.
The fourth mistake is over engineering. A system with fourteen labeled sub containers looks impressive and does not survive a tired repack in the rain. Fewer categories, honestly maintained, beat a perfect scheme that nobody follows after dark.
Frequently Asked Questions
What is the best way to organize camping gear? Assign one container per category and never mix. Shelter, sleep, kitchen, light and power, hygiene, and repair covers most car camping setups, and checking six containers is far faster than checking forty items.
Should I use bins or bags for camping gear? Both. Rigid bins for anything with weight or sharp edges, soft duffels for bulky light items like bedding, because duffels fill the awkward gaps in a loaded car that a rectangular box cannot.
How do I stop losing small camping items? Give them a hook and a pouch. A hanging organizer on a canopy leg keeps headlamps, keys and bug spray visible, and colored pouches inside bins keep batteries, cables and first aid from migrating.
Where should the first aid kit live? In its own clearly marked pouch, stored where anyone can reach it without unloading the car, not buried in a bin. Tell everyone in the group where it is before you need it.
How do I label containers so labels last? Print or write the label, then cover it with clear packing tape on the end that faces out when stacked. Marker directly on plastic fades in sun, and paper alone will not survive a wet weekend.
Do I need a separate container for wet gear? Yes, in practice. A collapsible crate or a dedicated bag for a wet fly, muddy stakes and damp towels keeps water out of the dry containers on the drive home, and it makes the drying job at home obvious.
The Bottom Line
A camp gear organizer system is categories first, containers second, labels always. Rigid crates take the heavy and sharp items, soft duffels swallow bedding and clothes, a hanging organizer keeps daily items off the ground, and colored pouches stop small parts from vanishing. Keep the number of categories small enough that you still follow the system when you are tired and it is raining. Read also our guide to camping storage bins that stack and seal for the container choice itself, and car camping setup for loading the vehicle in the right order.